One of the most popular projects to make with a Cricut is Tshirts! It is so fun to make shirts with Cricut because you can completely customize them.
If you have a Cricut and haven’t started to make tshirts yet, you are missing out!
I know there are so many things you can make with a Cricut, Such as reusable stencils, personalized wine glasses, and more. But my favorite Cricut craft is personalized shirts.
Making your tshirts allow you to express yourself and design just about any shirt you want.
So whether you want to make a t-shirt for a holiday, birthday, vacation, or just because, making your own t-shirt with a Cricut is pretty easy.
You can create your own design or buy ready-made files, also known as SVG files to make shirts with your Cricut.
WHAT YOU NEED TO MAKE SHIRTS WITH CRICUT
Before you can get started, you need just a couple of supplies to make your shirts.
- Heat Transfer Vinyl
- Plain T-shirt
- Teflon Sheet
- Weeding tools
- T-shirt Craft Ruler Guide
- Heat Press or Easy Press
- Cricut Cutting Machine
- Cricut Mat
Favorite Shirts for Cricut Shirts
When you want to make
HOW TO MAKE SHIRTS WITH CRICUT
1 – DESIGN
First you need to decide on a design that you want on the shirt.
You can either create your own design or upload an SVG File to Cricut Design Space.
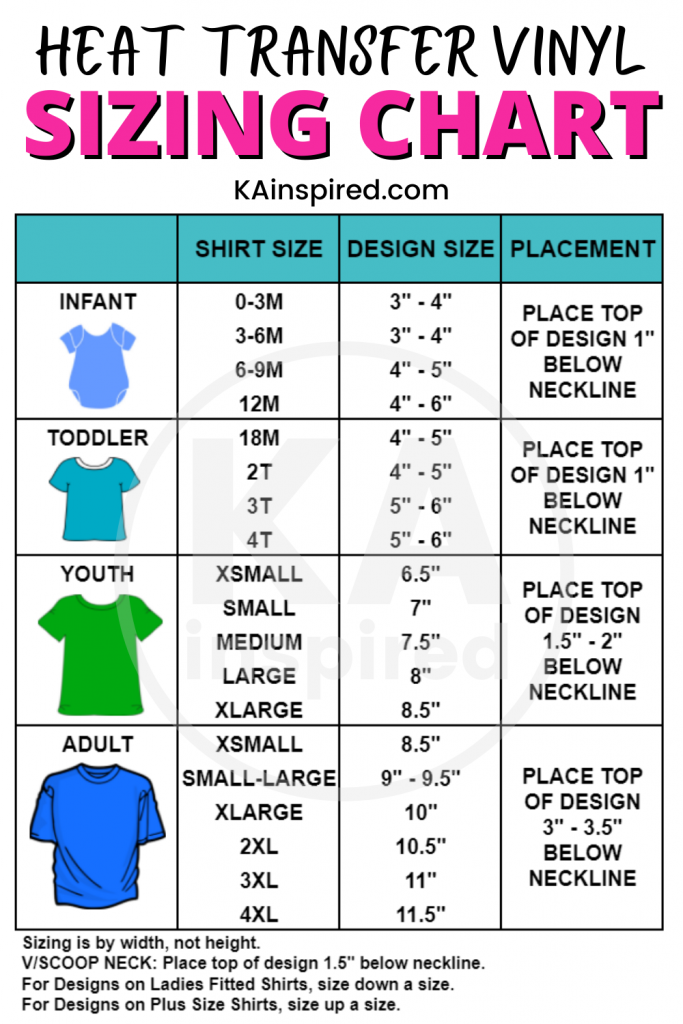
2- SIZE THE SHIRT DESIGN
Once you have decided on the design you want to put on your shirt, you’ll want to make the design the right size for your t-shirt.
The size of the design will depend on the size of the shirt.
Here is an easy guide to follow to help you decide the size of the design based on the size of the shirt.
3 – CUT THE DESIGN
Once your Design is the right size, you’ll want to cut it out with your Cricut Cutting Machine by placing the HTV vinyl shiny side down on the Cricut Cutting Mat.
You’ll want to choose the material and select Mirror. Then cut your design.
4 – WEED THE DESIGN
Once the design is cut, you’ll need to weed the excess vinyl.
This just means you remove the negative parts of your design so you are left with the cut out of the design that will go on your shirt.
You can use weeding tools to help with removing the small pieces.
3 – APPLY THE IRON-ON VINYL
Once your design is cut and weeded, it’s time to prep your shirt.
First you’ll want to turn on your Heat Press or Easy Press.
If you don’t have either of these you’re going to want to check out this post: Heat Press vs. Easy Press to help you to decide which is best for you.
Once the machine is hot enough, press the shirt to remove any moisture. This will help with applying the design.
Next, place your iron-on vinyl design in the spot you want it to be on the shirt. You can use a T9shirt Craft Ruler Guide to help you get the design placed correctly.
Once the design is in the right spot, place your Teflon sheet over the shirt and the design. Use your heat press to press the shirt for approx. 30 seconds (or as long as the instructions on the material says to).
Once done, remove the Teflon sheet and then peel the carrier sheet. (Double check the material instructions to see if it’s a cold peel or hot peel).
MAKING SHIRTS WITH CRICUT
Making your own shirt with a Cricut machine is very simple to do.
Once you start making shirts, you are going to want to make shirts for everything.
So have fun and get creative with your shirts. Use different types of HTV vinyl to make your Cricut shirts stand out.
HOW TO MAKE SHIRTS WITH CRICUT
