Have you been wanting to make your own DIY Front Door Round Welcome Sign with your Cricut?
I recently made this front door round welcome sign and I’m obsessed! So I wanted to share it with you since it was very easy to make.
I’ve made so many farmhouse signs before and personalized round trays, but never a front door round welcome wood sign.
But now I can’t wait to make more!
It was a fun Cricut DIY project that you can easily customize by using any phrase you want. I loved this phrase: “Welcome-ish, depends who you are and how long you are staying” so I went with that phrase for this farmhouse round sign.
Let’s face it – it sets the tone for anyone who shows up unannounced. I don’t know about you, but if I don’t know ahead of time you are coming, I hope you don’t stay long. haha!!

Want other easy DIY Projects, check out this DOLLAR TREE ARCHED LANTERN!
MATERIALS TO MAKE A DIY FRONT DOOR ROUND WELCOME SIGN
- Round Wood Cricles (or get these similar Round Cricles on Amazon)
- Stain Color of your choice
- Polycrylic
- Black Chalk Paint
- White Vinyl
- Paint Brushes
- Painters Tape
- Black Plaid Ribbon
HOW TO MAKE DIY FRONT DOOR ROUND WELCOME SIGN
1 – PREPARE WOOD CIRCLES
First, you will want to sand the round wood circle and get it ready to stain.
Once it is sanded, you’ll want to stain it with your favorite wood stain and let it fully dry. (Follow the instructions on your stain can on how to stain and how long it needs to dry).
2 – PAINT
After the stain is fully dried, you’ll want to use painter’s tape to mark the thick stripe you’ll paint.
So place one strip of painter’s tape horizontally in the middle of the board. Then the second strip of painter’s tape a few inches from the bottom of the round board.
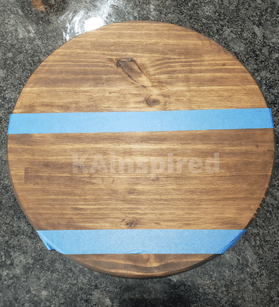
Next, Paint between the painter’s tape with black chalk paint. Follow the instructions on your chalk paint with how many coats. Once the final coat is painted, slowly remove the painter’s tape. You should have a crisp clean lines.
Let the paint fully dry.
3 – DESIGN
While your round circle is drying, you can design your welcome sign with Cricut Design Space.
Once you have designed your welcome sign, you’ll want to decide if you’ll use a vinyl decal or make a stencil with your Cricut to paint the design on the round wood circle.
Once you have decided, you’ll want to cut it out with your Cricut Machine.
For this project, I decided to make the design with outdoor premium vinyl but I’ve made many signs with stencils and painted the design. So either option will work.
4 – POLYCRYLIC
After the stain and chalk paint has dried, you will want to paint a light coat of Polycrylic over the entire round wood welcome sign.
Since it is a DIY Front Door Round Welcome Sign, chances are it will be kept outside. So the polycrylic will help to keep the wood round sign safe from the weather and keep your design intact from weather elements.

5 – APPLY VINY DECALS
Once your round circle is stained and painted, it’s time to apply the vinyl decal you designed and cut with your Cricut.
Place it where you want over the thick black stripe of paint.
If you’d rather paint the design onto the wood circle sign, this is when you would apply the Cricut Stencil. Then paint your design on and remove the stencil and let the paint dry.
6 – SEAL THE ROUND OUTDOOR SIGN
To complete your DIY FRONT DOOR ROUND WELCOME SIGN, you’ll want to apply Polycrylic again.
I know you put a thin layer on before the vinyl design, but now you’ll want to apply more Polycrylic over the entire wood sign. Do 2 to 3 light coats of polycrylic and let it fully dry in between coats.
Applying the Polycrylic over the entire wood sign and the vinyl will help to seal the sign so it can be used outdoors. This will ensure the vinyl does not lift and the sign is protected from weather elements.
7 – ADD A BOW
The final step to a Front Door Round Welcome Sign is the bow! You can also add some faux greenery or flowers
While I’m not an expert at making bows (something I’ll keep working on) but mine came out good enough for me.
Add the bow to the top of the sign. You can secure it with glue or a staple.

8 – HOW TO HANG A ROUND SIGN
Once your sign is complete. you’ll want to decide on how you want to hang your sign on your front door.
There are a couple of different ways to hang the sign:
- attach hardware to the back
- add command strips to the back
- Drill a Hole through the sign and tie a string
- Use a staple gun to staple string to the back of the sign
- Use a Glue Gun to hold the string
DIY FRONT DOOR ROUND WELCOME SIGN
That’s it – that’s how you make a Front Door Round Welcome sign with a Cricut.
You can paint or stain the round wood any color you choose and you can select any phrase you want.
Some people like to change out the front door sign each season so they’ll have a fall sign or Christmas sign they’ll use during those holidays.
So you can customize the sign however you want or you can make multiples to change out every season. That’s what is amazing about these round wood signs, you can make them any way you want.
Leave a comment below and let me know what your favorite welcome phrase is.
Leave a Reply